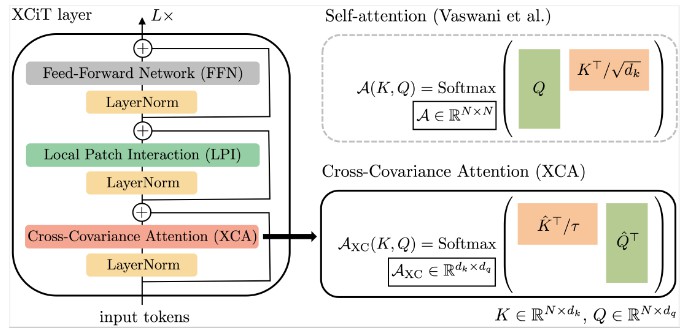
Cross-Covariance Image Transformer (XCiT)
PyTorch implementation and pretrained models for XCiT models. See XCiT: Cross-Covariance Image Transformer
Linear complexity in time and memory
Our XCiT models has a linear complexity w.r.t number of patches/tokens: “>
</th>
<th style=)   | |
|---|---|
| Peak Memory (inference) | Millisecond/Image (Inference) |
Scaling to high resolution inputs
XCiT can scale to high resolution inputs both due to cheaper compute requirement as well as better adaptability to higher resolution at test time (see Figure 3 in the paper)
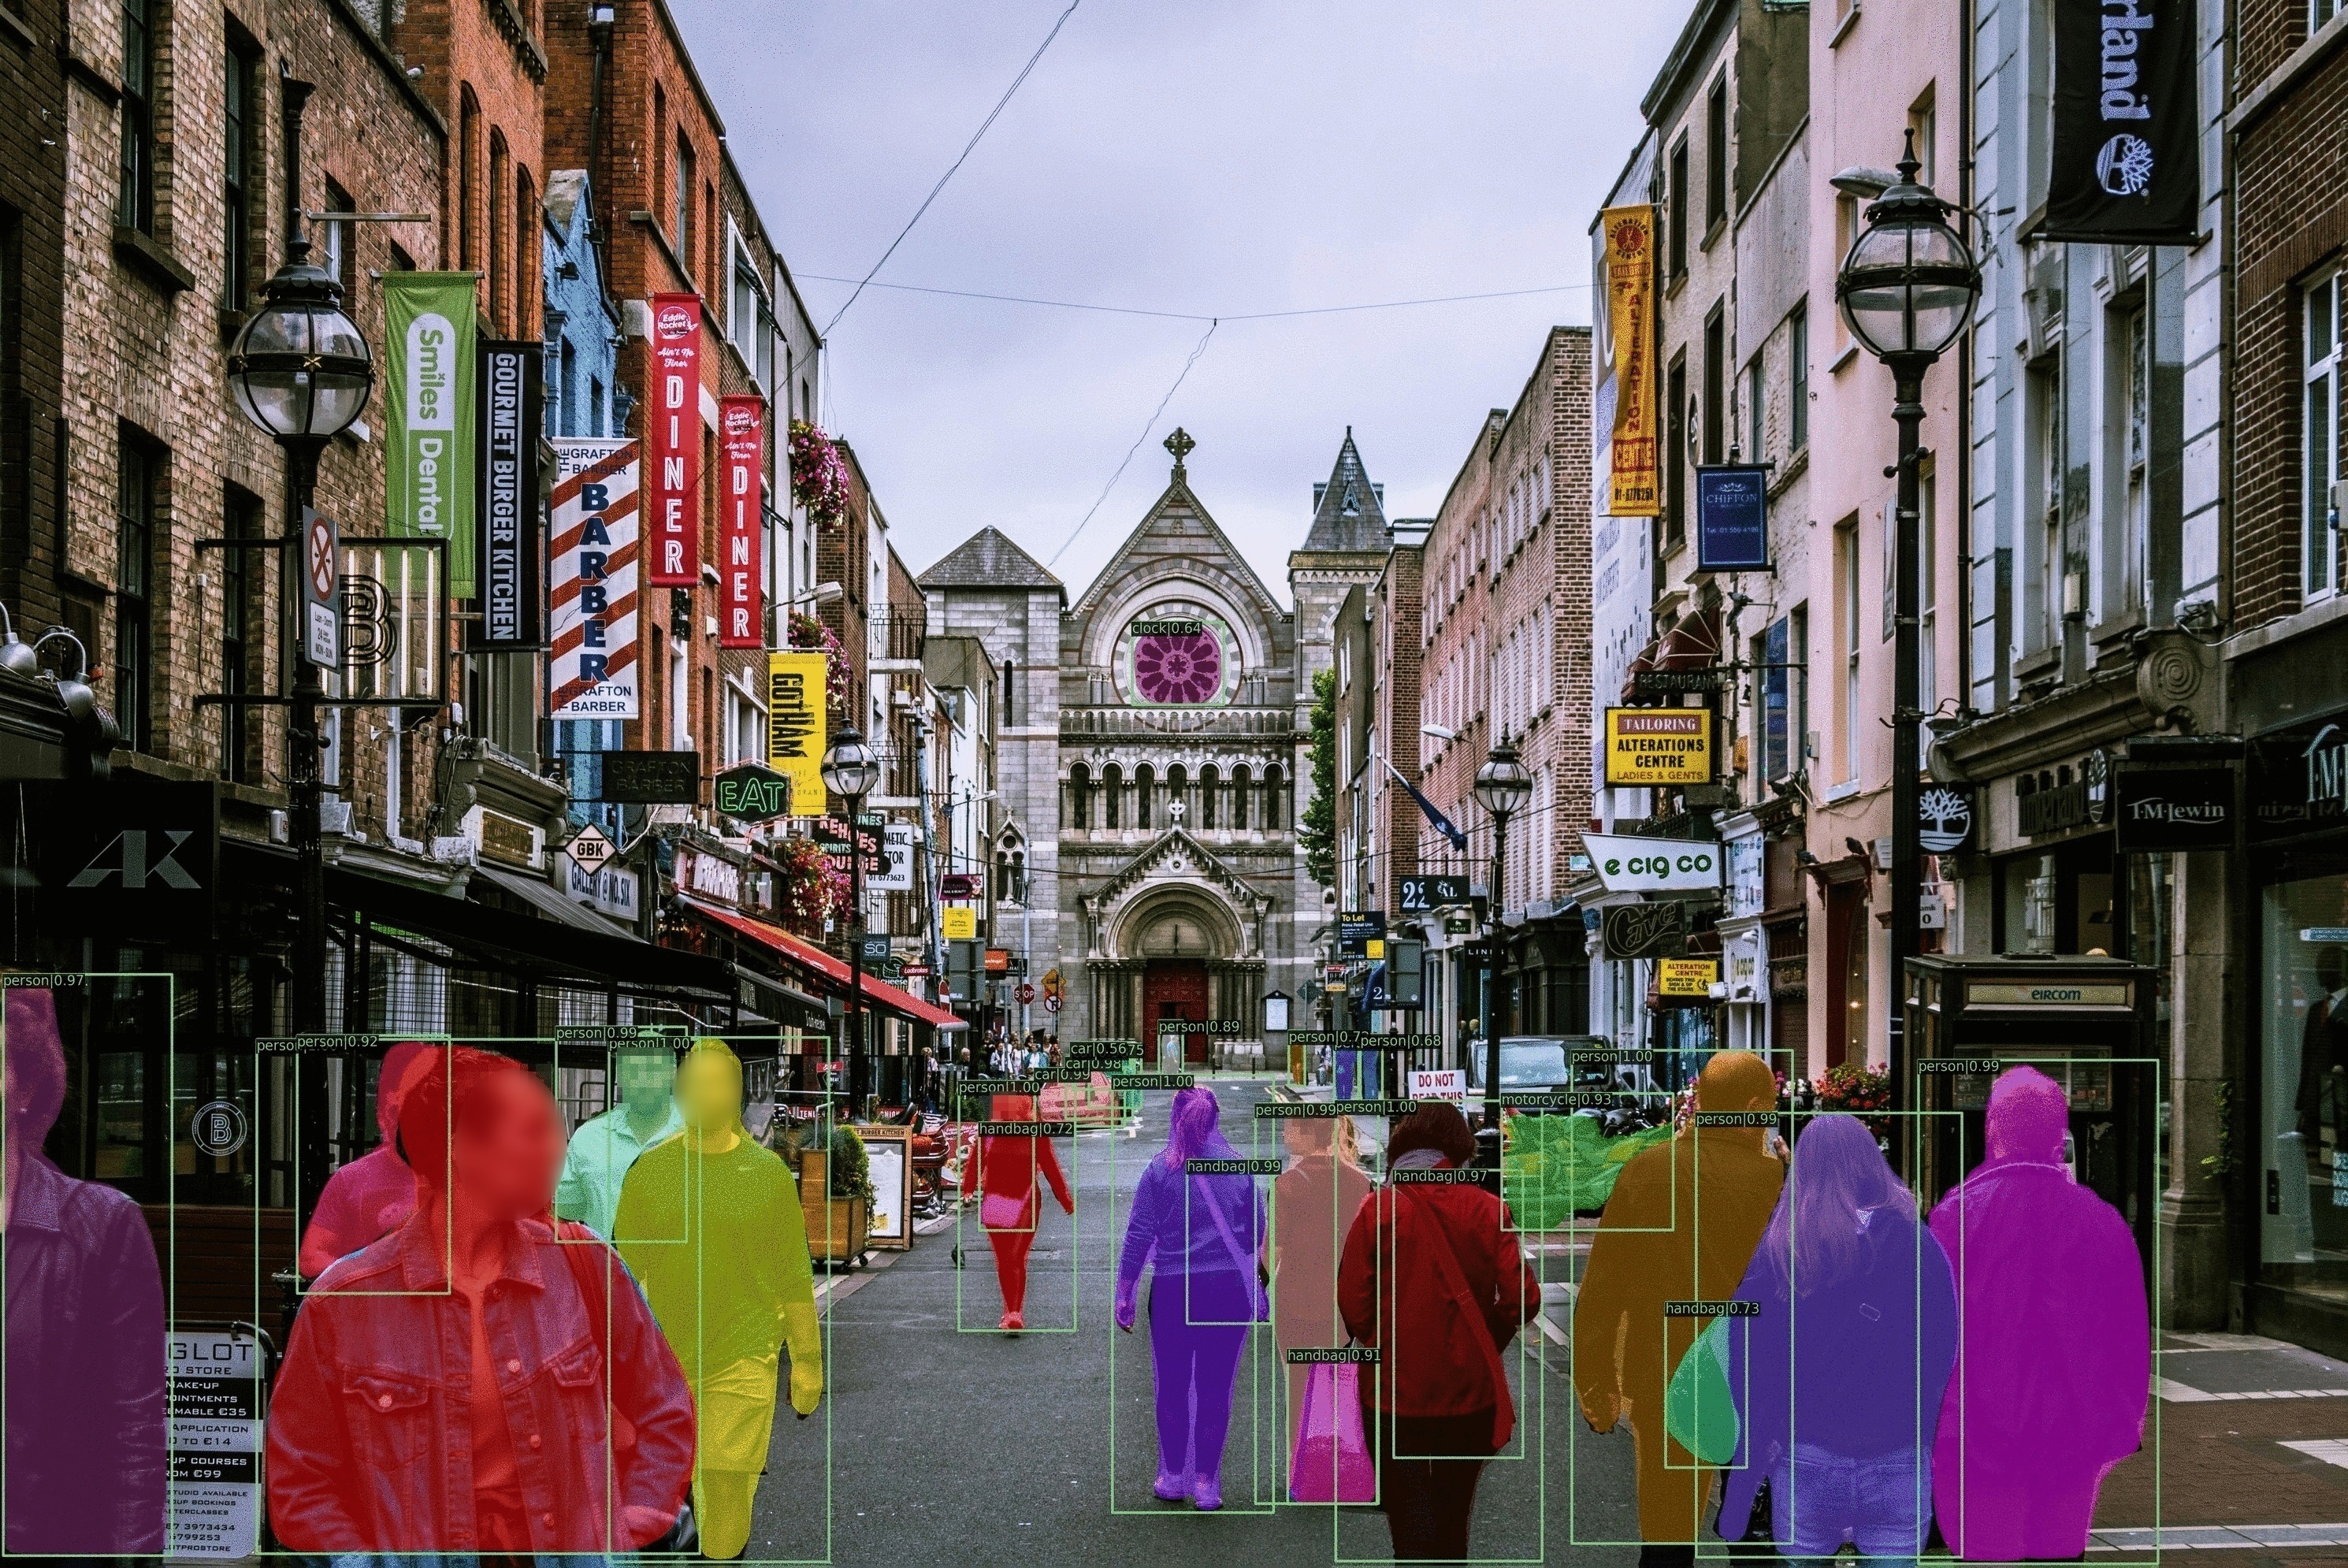
Detection and Instance Segmentation for Ultra high resolution images (6000x4000)
XCiT+DINO: High Res. Self-Attention Visualization :t-rex:
Our XCiT models with self-supervised training using DINO can obtain high resolution attention maps.
Self-Attention visualization per head
Below we show the attention maps for each of the 8 heads separately and we can observe that every head specializes in different semantic aspects of the scene for the foreground as well as the background.
Getting Started
First, clone the repo
git clone https://github.com/facebookresearch/XCiT.git
Then, you can install the required packages including: Pytorch version 1.7.1, torchvision version 0.8.2 and Timm version 0.4.8
pip install -r requirements.txt
Download and extract the ImageNet dataset. Afterwards, set the --data-path argument to the corresponding extracted ImageNet path.
For full details about all the available arguments, you can use
python main.py --help
For detection and segmentation downstream tasks, please check:
COCO Object detection and Instance segmentation: XCiT Detection
ADE20k Semantic segmentation: XCiT Semantic Segmentation
Model Zoo
We provide XCiT models pre-trained weights on ImageNet-1k.
§: distillation
Models with 16x16 patch size
| Arch | params | Model | |||||
|---|---|---|---|---|---|---|---|
| 224 | 224 § | 384 § | |||||
| top-1 | weights | top-1 | weights | top-1 | weights | ||
| xcit_nano_12_p16 | 3M | 69.9% | download | 72.2% | download | 75.4% | download |
| xcit_tiny_12_p16 | 7M | 77.1% | download | 78.6% | download | 80.9% | download |
| xcit_tiny_24_p16 | 12M | 79.4% | download | 80.4% | download | 82.6% | download |
| xcit_small_12_p16 | 26M | 82.0% | download | 83.3% | download | 84.7% | download |
| xcit_small_24_p16 | 48M | 82.6% | download | 83.9% | download | 85.1% | download |
| xcit_medium_24_p16 | 84M | 82.7% | download | 84.3% | download | 85.4% | download |
| xcit_large_24_p16 | 189M | 82.9% | download | 84.9% | download | 85.8% | download |
Models with 8x8 patch size
| Arch | params | Model | |||||
|---|---|---|---|---|---|---|---|
| 224 | 224 § | 384 § | |||||
| top-1 | weights | top-1 | weights | top-1 | weights | ||
| xcit_nano_12_p8 | 3M | 73.8% | download | 76.3% | download | 77.8% | download |
| xcit_tiny_12_p8 | 7M | 79.7% | download | 81.2% | download | 82.4% | download |
| xcit_tiny_24_p8 | 12M | 81.9% | download | 82.6% | download | 83.7% | download |
| xcit_small_12_p8 | 26M | 83.4% | download | 84.2% | download | 85.1% | download |
| xcit_small_24_p8 | 48M | 83.9% | download | 84.9% | download | 85.6% | download |
| xcit_medium_24_p8 | 84M | 83.7% | download | 85.1% | download | 85.8% | download |
| xcit_large_24_p8 | 189M | 84.4% | download | 85.4% | download | 86.0% | download |
XCiT + DINO Self-supervised models
| Arch | params | k-nn | linear | download |
|---|---|---|---|---|
| xcit_small_12_p16 | 26M | 76.0% | 77.8% | backbone |
| xcit_small_12_p8 | 26M | 77.1% | 79.2% | backbone |
| xcit_medium_24_p16 | 84M | 76.4% | 78.8% | backbone |
| xcit_medium_24_p8 | 84M | 77.9% | 80.3% | backbone |
Training
For training using a single node, use the following command
python -m torch.distributed.launch --nproc_per_node=[NUM_GPUS] --use_env main.py --model [MODEL_KEY] --batch-size [BATCH_SIZE] --drop-path [STOCHASTIC_DEPTH_RATIO] --output_dir [OUTPUT_PATH]
For example, the XCiT-S12/16 model can be trained using the following command
python -m torch.distributed.launch --nproc_per_node=8 --use_env main.py --model xcit_small_12_p16 --batch-size 128 --drop-path 0.05 --output_dir /experiments/xcit_small_12_p16/ --epochs [NUM_EPOCHS]
For multinode training via SLURM you can alternatively use
python run_with_submitit.py --partition [PARTITION_NAME] --nodes 2 --ngpus 8 --model xcit_small_12_p16 --batch-size 64 --drop-path 0.05 --job_dir /experiments/xcit_small_12_p16/ --epochs 400
More details for the hyper-parameters used to train the different models can be found in Table B.1 in the paper.
Evaluation
To evaluate an XCiT model using the checkpoints above or models you trained use the following command:
python main.py --eval --model <MODEL_KEY> --input-size <IMG_SIZE> [--full_crop] --pretrained <PATH/URL>
By default we use the --full_crop flag which evaluates the model with a crop ratio of 1.0 instead of 0.875 following CaiT.
For example, the command to evaluate the XCiT-S12/16 using 224x224 images:
python main.py --eval --model xcit_small_12_p16 --input-size 384 --full_crop --pretrained https://dl.fbaipublicfiles.com/xcit/xcit_small_12_p16_224.pth
Acknowledgement
This repository is built using the Timm library and the DeiT repository. The self-supervised training is based on the DINO repository.
GitHub
https://github.com/facebookresearch/xcit
Source: https://pythonawesome.com/pytorch-implementation-and-pretrained-models-for-xcit-models/